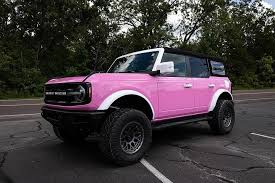
Step-by-Step Guide to Applying Orafol Vehicle Wraps
Applying a vehicle wrap is a fantastic way to give your car a fresh and professional look, protect its original paint, or promote your business. Orafol Vehicle Wraps are known for their high-quality materials and durability. If you're considering applying one yourself, follow this step-by-step guide to achieve a flawless finish.
Step 1: Gather Your Tools and Materials
Before starting, ensure you have all the necessary tools:
- Orafol vehicle wrap
- Squeegee or application tool
- Heat gun or hairdryer
- Utility knife or precision cutter
- Cleaning solution (isopropyl alcohol works well)
- Microfiber cloth
- Masking tape
Step 2: Prepare the Vehicle
Thorough preparation is key to a successful wrap application:
1. Clean the Surface: Wash your vehicle thoroughly to remove dirt, grease, and debris. Use isopropyl alcohol and a microfiber cloth to ensure the surface is spotless and free of wax or polish.
2. Inspect the Surface: Check for dents, scratches, or imperfections. The wrap will adhere better to a smooth surface, so repair any damage beforehand.
Step 3: Measure and Cut the Wrap
Unroll the Orafol wrap and measure it against the sections of your vehicle. Cut the wrap into manageable pieces, leaving extra material around the edges to account for adjustments.
Step 4: Position the Wrap
Align the cut piece of wrap onto the desired section of your vehicle. Use masking tape to hold it in place temporarily. Ensure it’s properly positioned before moving to the next step.
Step 5: Apply the Wrap
1. Peel and Stick: Carefully peel off the backing paper from one edge of the wrap and begin applying it to the vehicle. Start from the center and work outward to avoid air bubbles.
2. Smooth It Out: Use a squeegee or application tool to press the wrap onto the surface, applying firm and even pressure. Work slowly to ensure a smooth finish.
Step 6: Use Heat for Curves and Edges
For curved areas or edges, use a heat gun or hairdryer to make the wrap more pliable. Gently stretch and mold the material into place, ensuring it adheres securely without wrinkles.
Step 7: Trim Excess Material
Once the wrap is applied, use a utility knife or precision cutter to trim any excess material around edges, seams, and panels. Be careful not to cut into the vehicle's paint.(Matte Metallic Vinyl Wrap)
Step 8: Final Inspection and Touch-Ups
Inspect your work for any air bubbles or imperfections. Use the heat gun to smooth out any remaining wrinkles and press down edges firmly for a seamless finish.
Step 9: Allow Time to Settle
Let the wrap cure for at least 24 hours before exposing it to extreme weather conditions or washing your vehicle. This ensures proper adhesion and longevity.
Conclusion
Applying an Orafol vehicle wrap can be a rewarding DIY project if done carefully. By following these steps and taking your time, you can achieve a professional-quality result that enhances your vehicle's appearance and protects its surface. Happy wrapping!